These Sheet Pan Chicken Tacos are stuffed with a delicious filling and baked in the oven until perfectly crispy. Add your favorite taco toppings for a fun and easy meal!
If you love this recipe, you’ll also love my Mini Sheet Pan Tostadas.
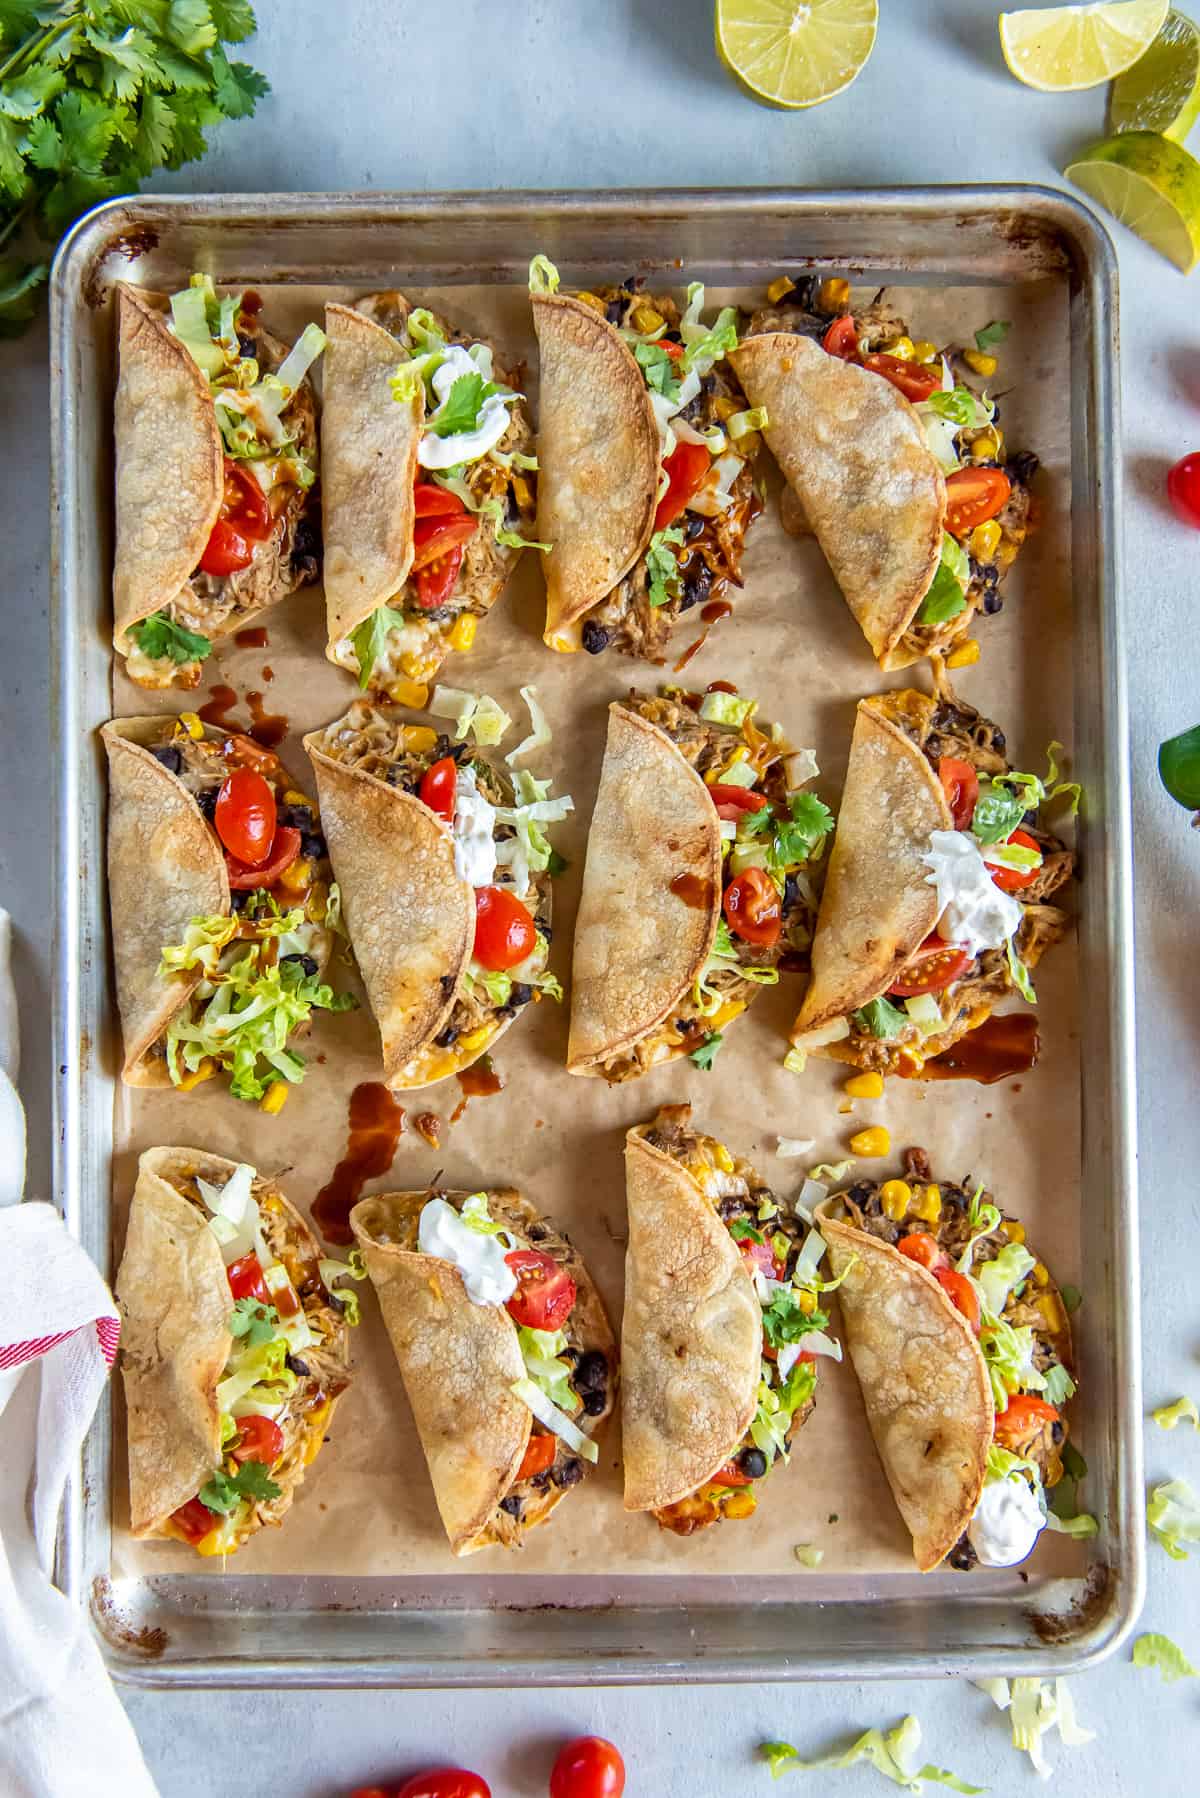
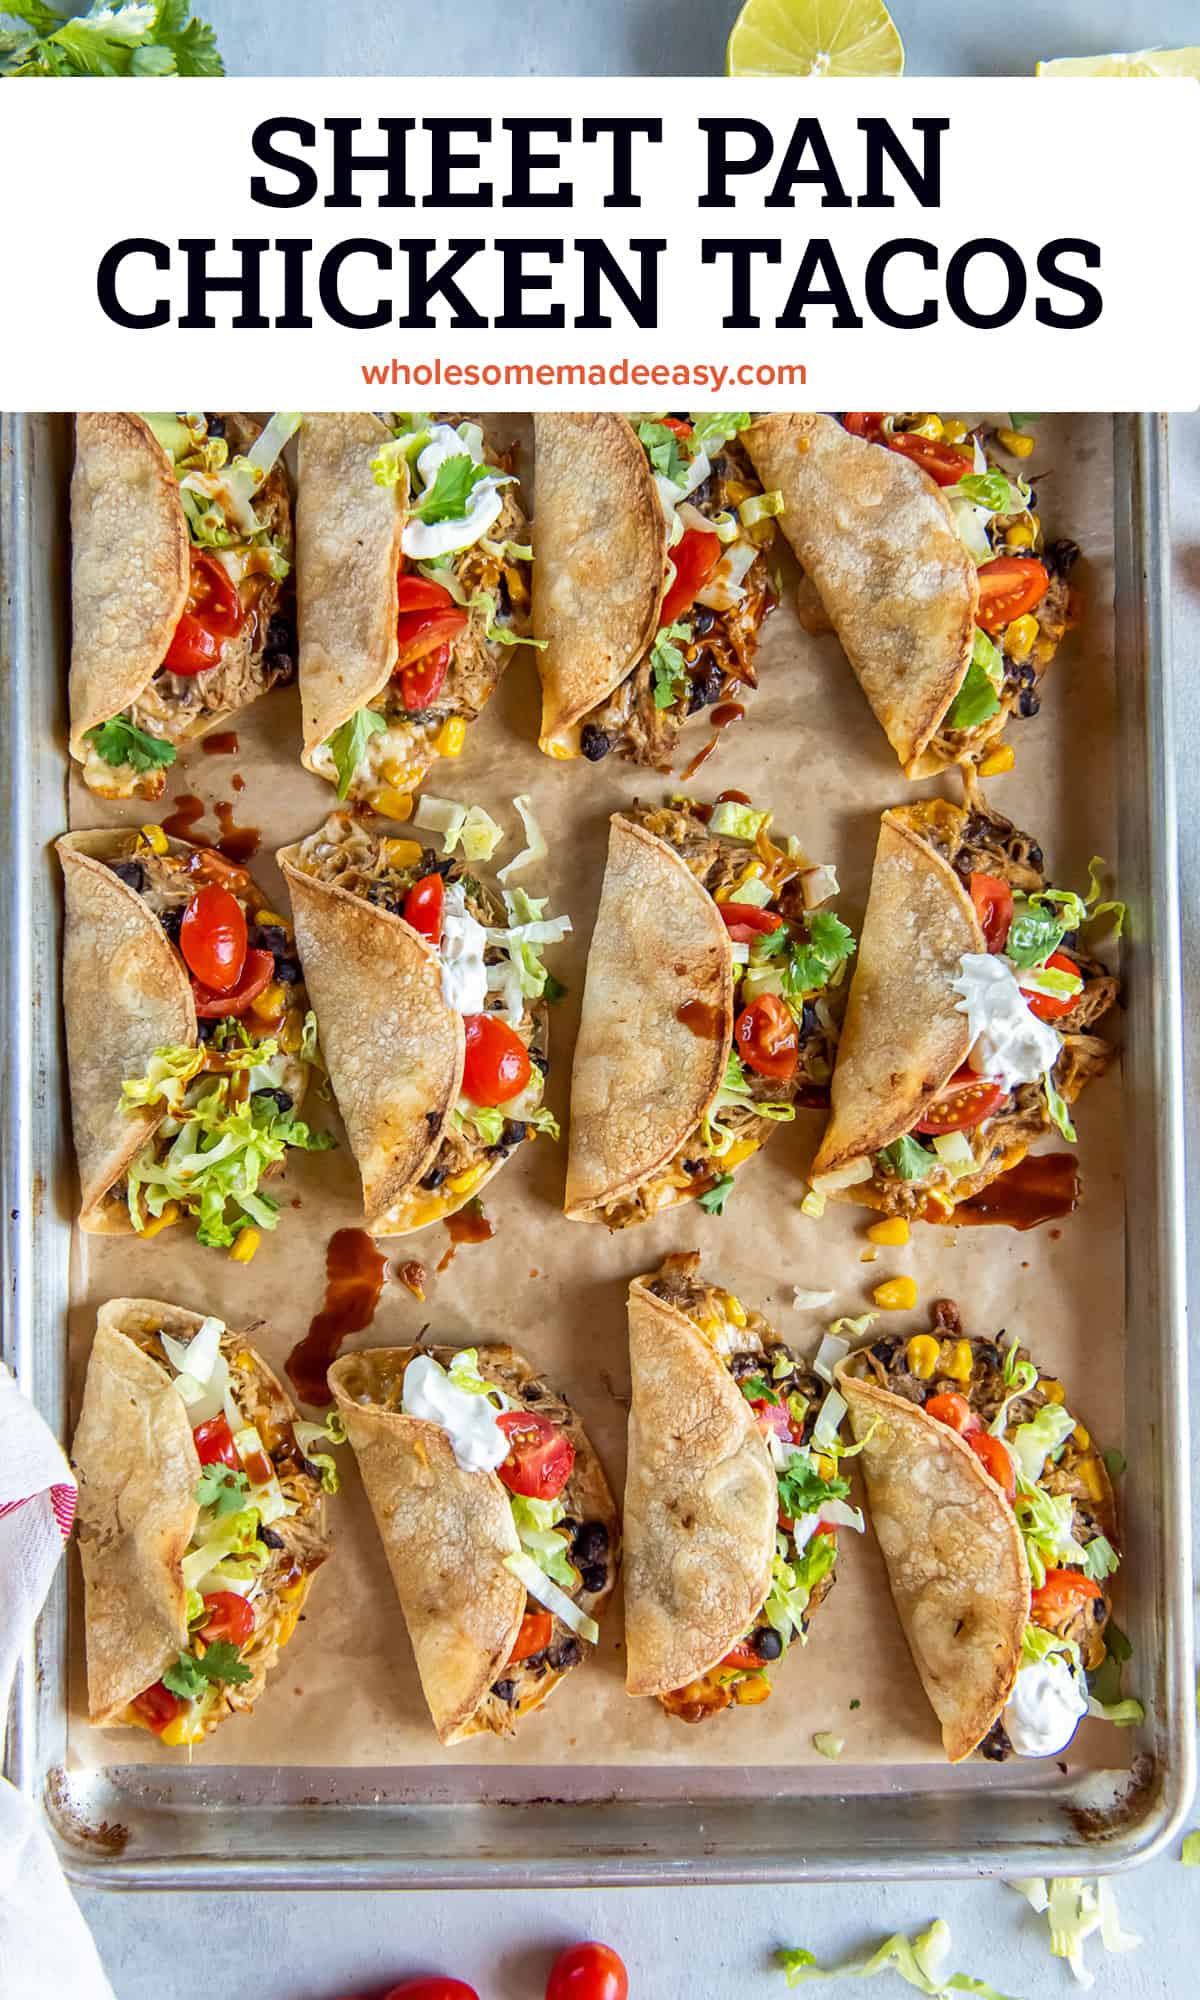
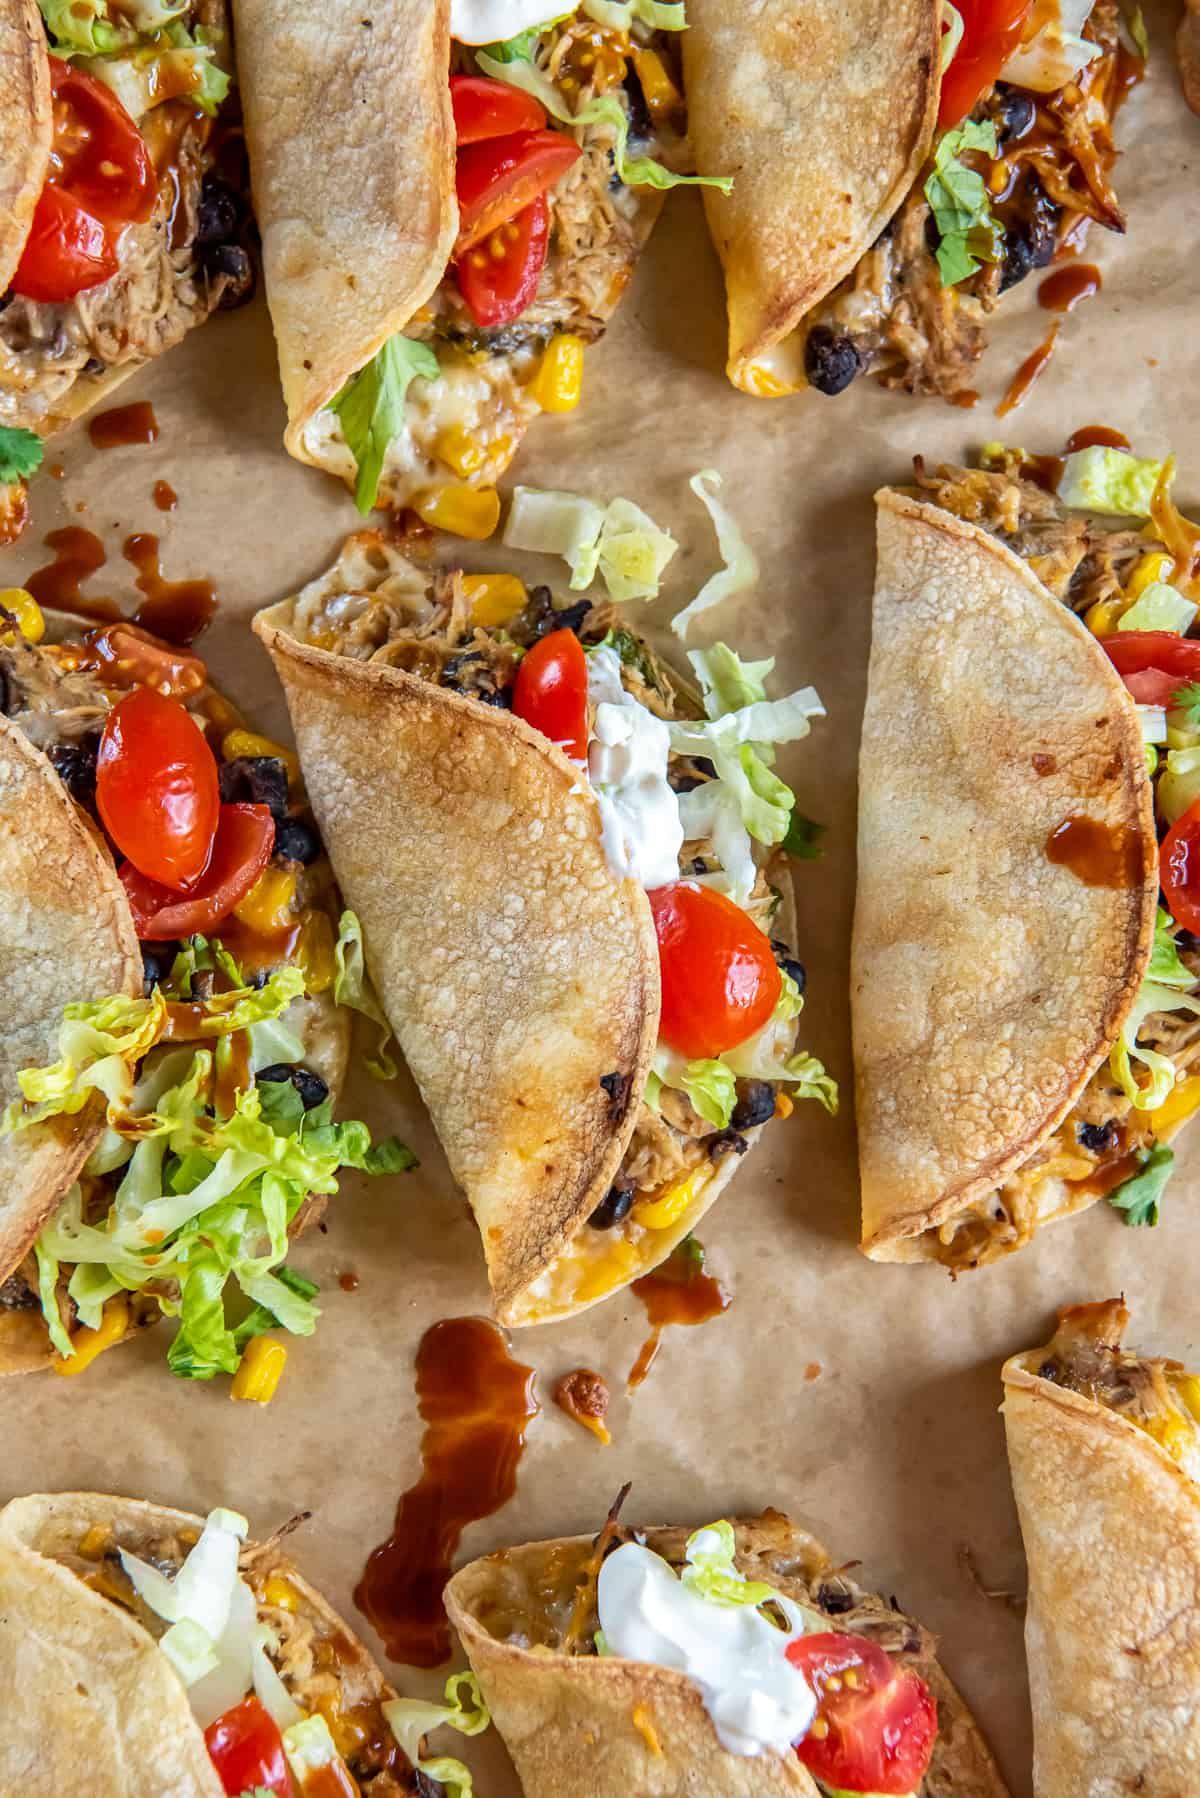
What could be better than a sheet pan full of crispy tacos stuffed with a filling of tender shredded chicken, black beans, corn, simmered in salsa verde? These fun tacos are a great choice for entertaining or a simple dinner any night of the week.
I’ve had so much fun developing sheet pan recipes like my absolutely delicious Mini Sheet Pan Tostadas, Sheet Pan Sausage and Potatoes, and Sheet Pan Chicken and Vegetables. Since we are basically taco obsessed in this house, these Sheet Pan Chicken Tacos just had to be next!
Table of contents
Recipe Highlights
- Less Oil: Skip the messy step of frying corn tortillas in oil. Instead, the tortillas are brushed with oil before they are assembled and baked in the oven. This clean method reduces the amount of oil to create healthier tacos.
- Big Batch: Eliminate the taco assembly line in your kitchen and bake and serve twelve tacos all at once!
- Quick Taco Filling: The filling is so easy to make with store-bought rotisserie chicken and some pantry staples.
- Easy to Customize: Substitute your favorite ingredients to make these tacos your own.
Ingredient Notes
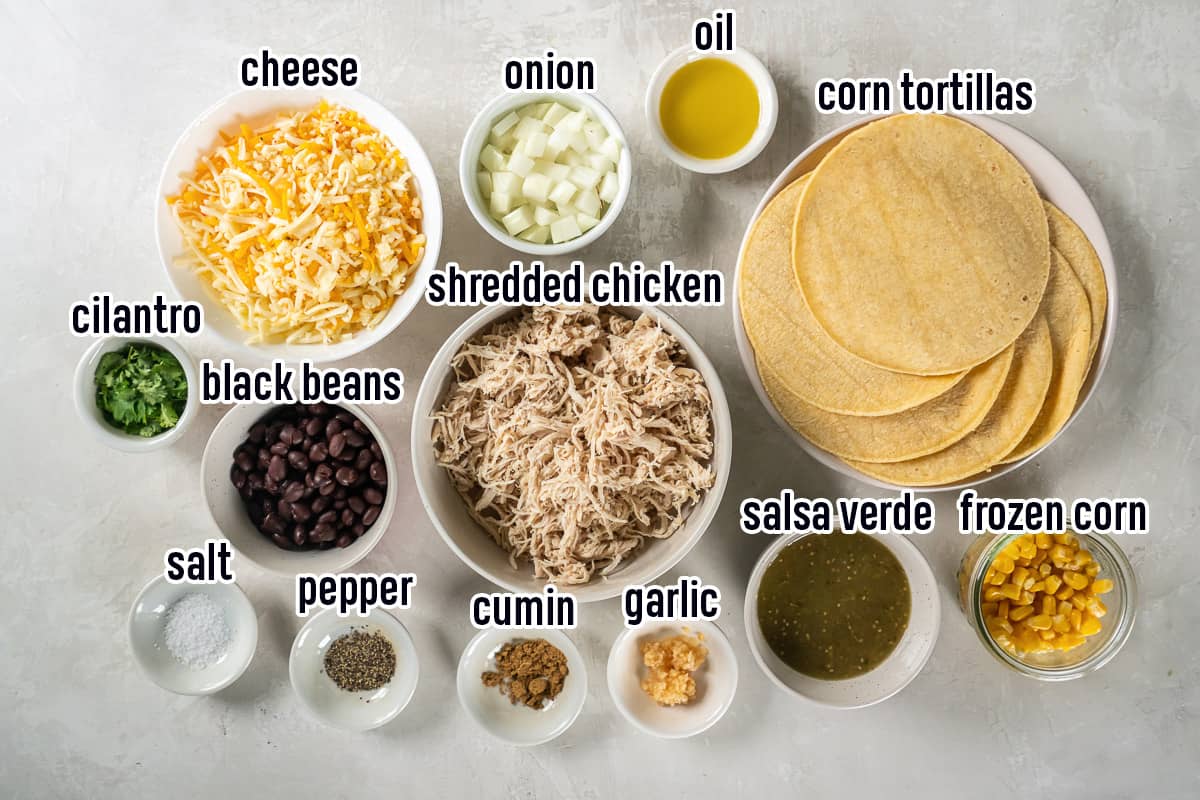
- Tortillas: Yellow corn tortillas are coated with vegetable oil before they are stuffed and baked.
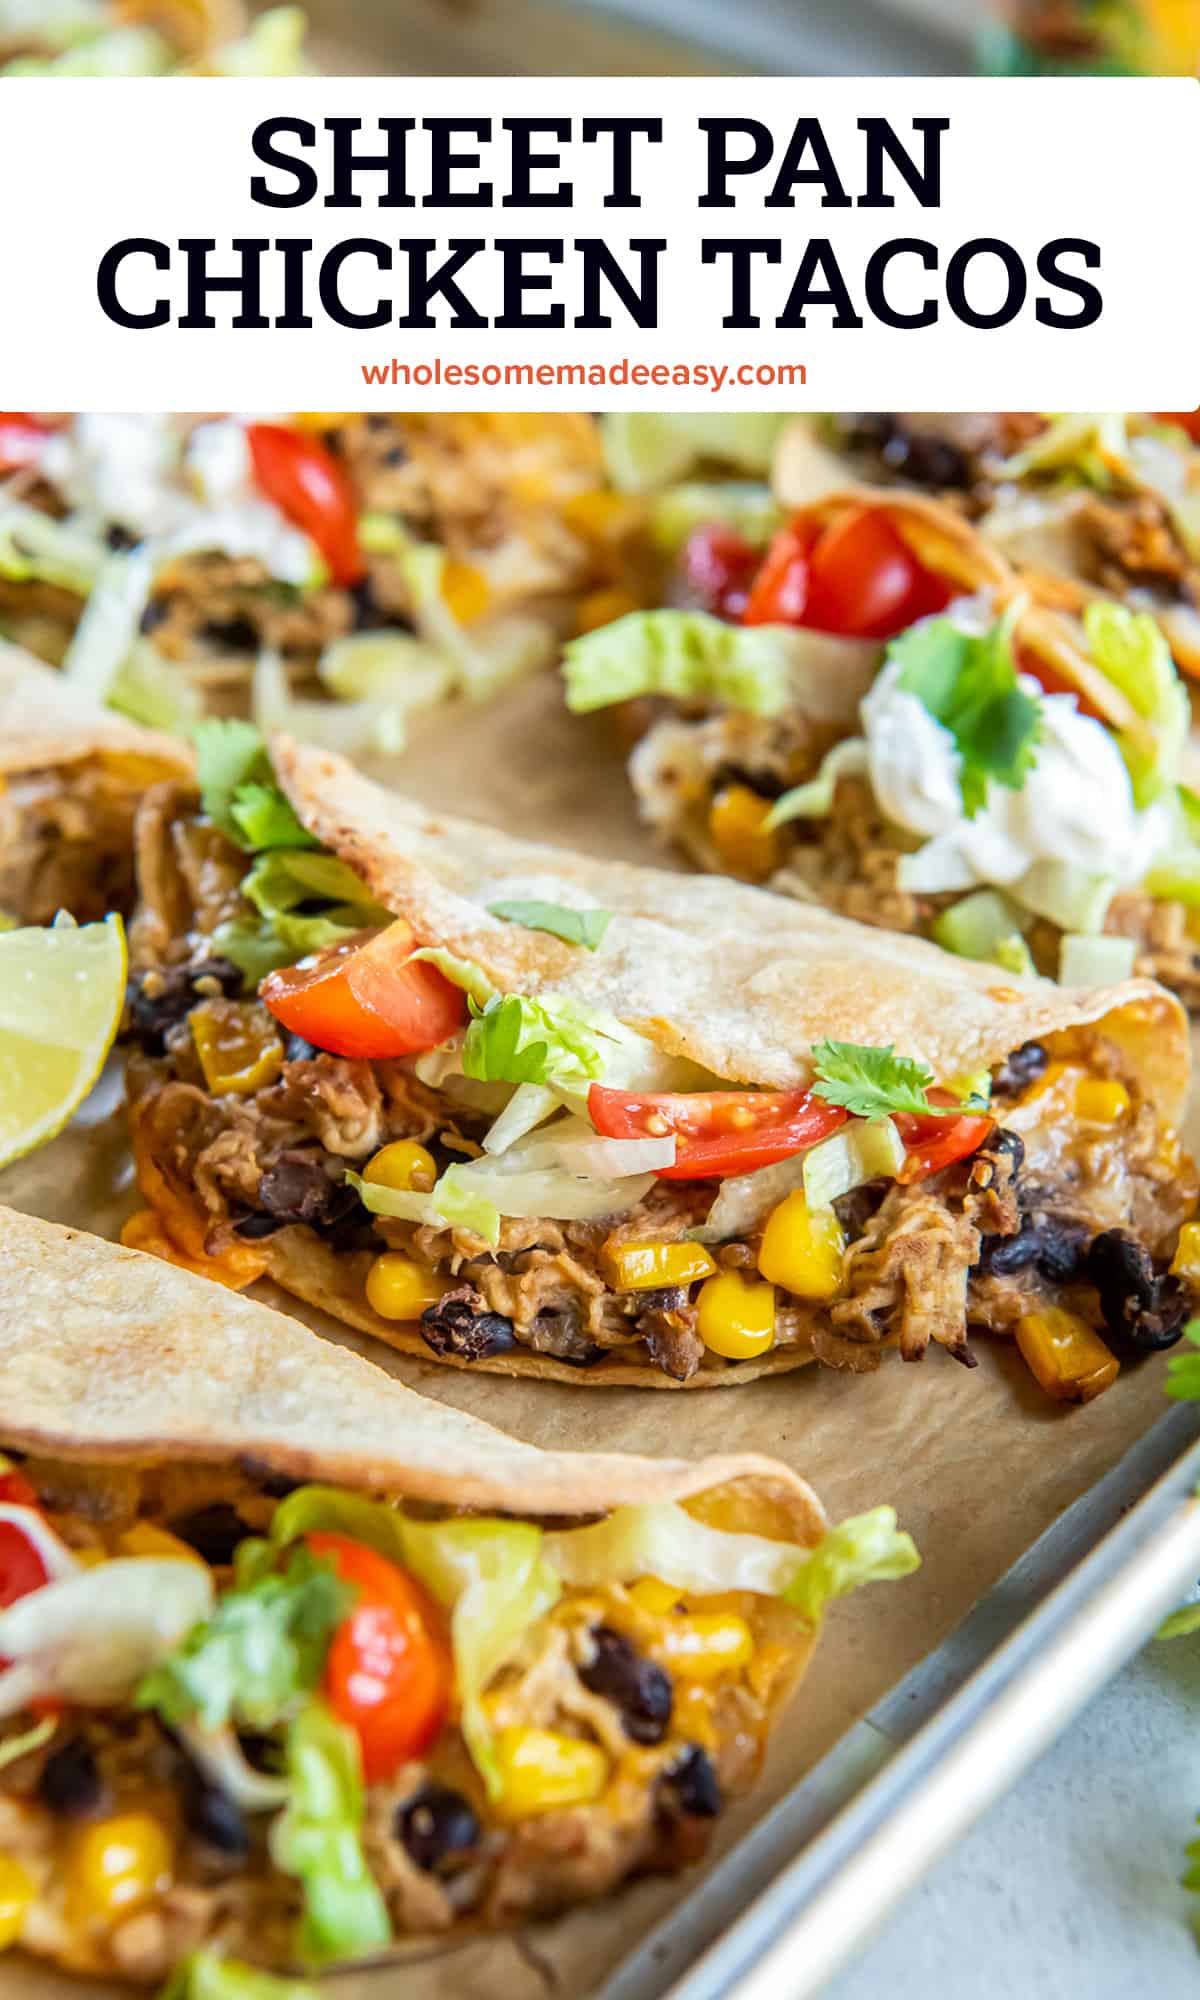
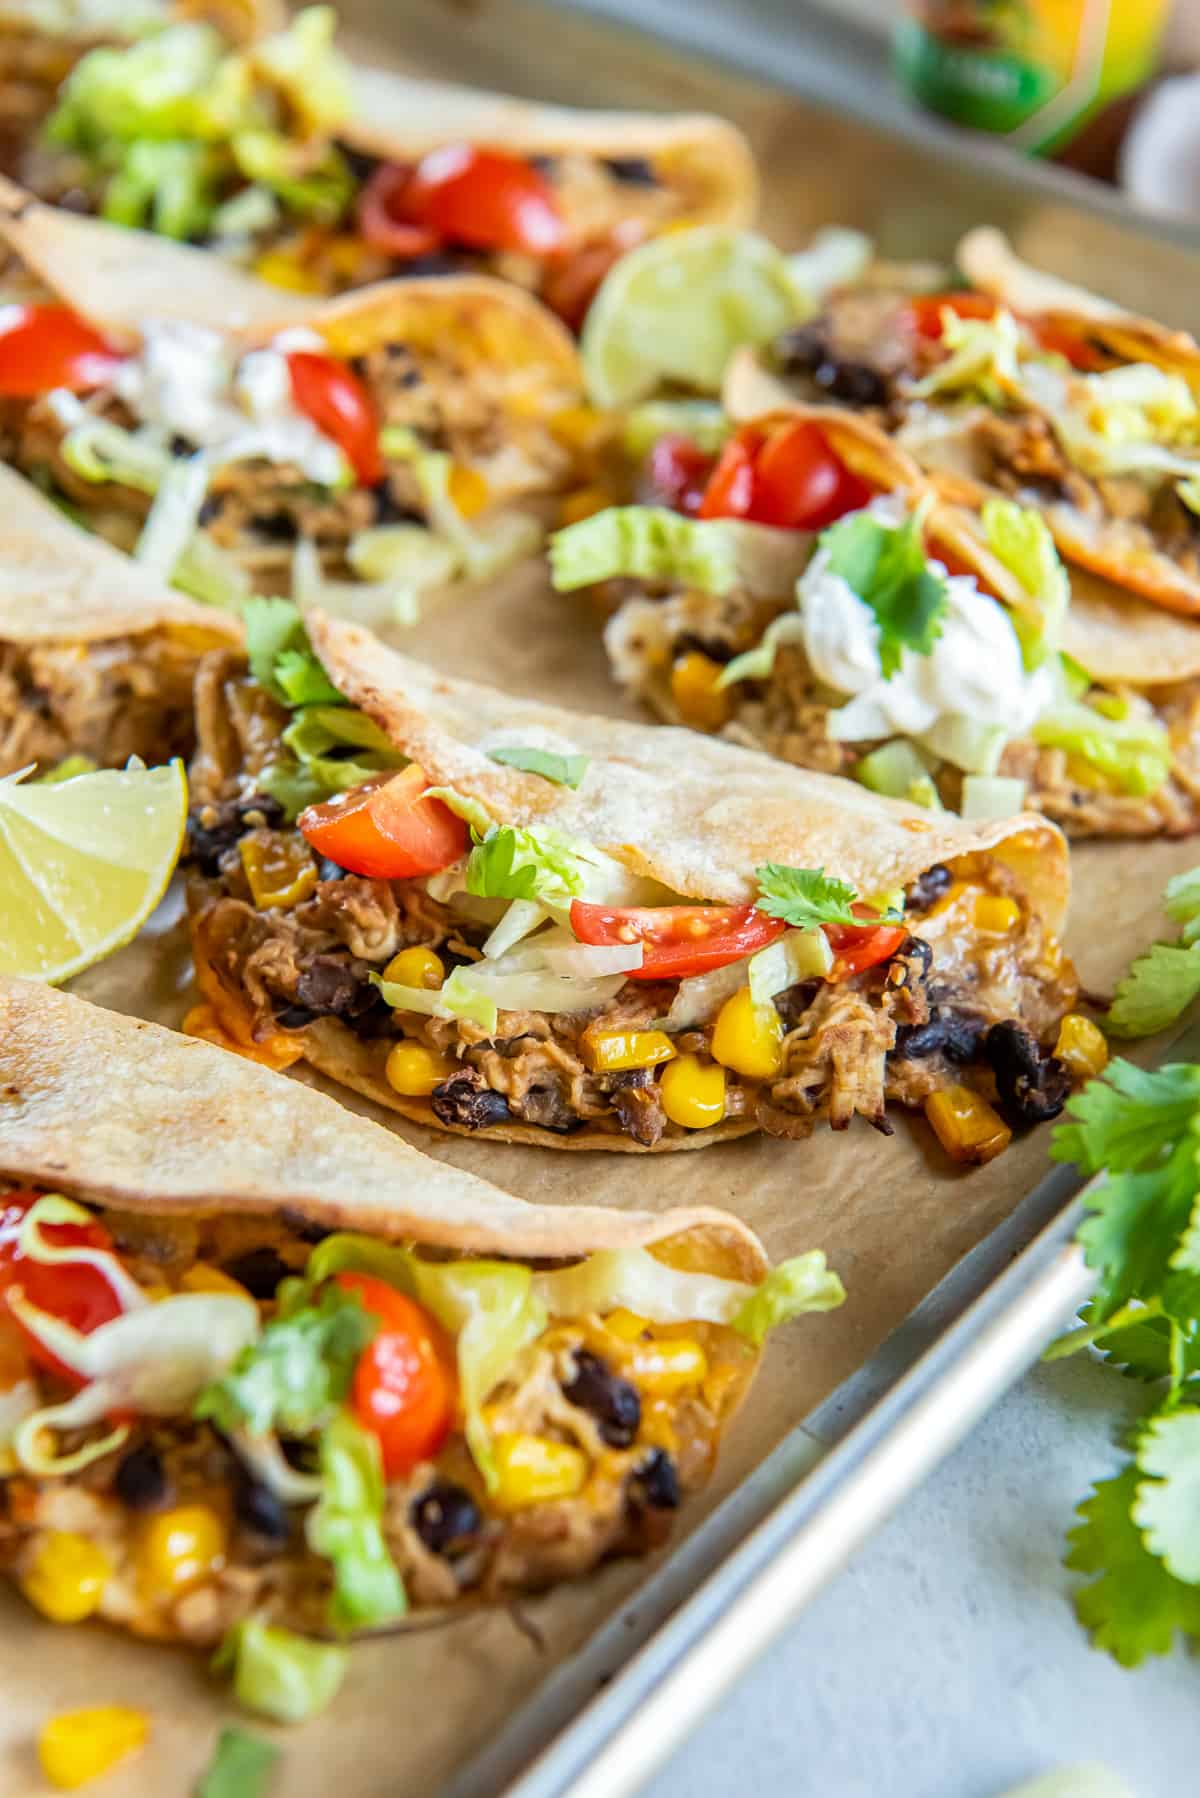
- Chicken filling: Shredded rotisserie chicken breast is cooked quickly on the stove with onion, garlic, canned black beans, frozen yellow corn, a little cumin, salt, pepper, and cilantro. Store-bought green salsa, like Herdez Salsa Verde, adds great flavor and a bit of a kick.
- Cheese: I like to use a combination of shredded sharp cheddar cheese and Monterey Jack cheese.
- Optional toppings: Add color, texture, and flavor with toppings like shredded iceberg lettuce, sliced cherry tomatoes, and sour cream. I always serve these with a bottle Chipotle Cholula Hot Sauce.

How to Make Sheet Pan Chicken Tacos
- Heat the olive oil in a skillet and sauté the onions until tender.
- Add the garlic, chicken, beans, corn, cumin, salt, and pepper and sauté for a couple of minutes.
- Add the salsa verde and increase heat as needed until the mixture is bubbly, then lower the heat and let it simmer for several minutes to thicken it slightly.
- Remove the skillet from the heat and stir in the cilantro.
Soften the Tortillas Before Filling
If you try to assemble the tacos without softening the tortillas in advance, they are going to crack. The solution is to wrap the tortillas in a double layer of wet paper towels and microwave them for 50 seconds, or until they are warm and pliable. If the tortillas crack, just return them to the microwave for 10 to 15 seconds to warm them a bit more. Coating the tortillas with vegetable oil will increase their pliability and make it less likely they’ll crack.
Assembling Sheet Pan Chicken Tacos
- Brush one side of the tortillas with vegetable oil and flip them over. Place about 2 tablespoons of shredded cheese on one half of the dry side of the tortilla.
- Then, place about ¼ cup of the chicken mixture on top of the cheese.
- Fold the tortillas in half and place the tacos on a baking sheet lined with parchment paper, pressing the tops down lightly.
- Repeat this process by heating the remaining tortillas, brushing them with oil, and stuffing them until you have a sheet pan full of tacos ready to bake.
- Bake in the preheated 425 degree F oven for about 20 minutes or until tortillas are golden and crispy. Remove from the oven and let them rest for about 5 minutes before adding toppings and serving.
Tips for the Best Sheet Pan Chicken Tacos
Work in batches: Warm the tortillas in batches of six and after the first six tacos, repeat the process to warm and stuff the remaining six tortillas.
Prevent Curling: If the tops of the tortillas begin to curl as they bake, open the oven and press down very lightly on the taco with a spatula (be careful not to squish filling out).
Adding Toppings: The tortillas will continue to crisp as the tacos rest so it’s best to garnish them before they crisp up too much. The top of the tortilla will lift easily after resting about 5 minutes but don’t wait too long before adding your favorite toppings.
Customize: There are countless ways you can make these tacos your own. Substitute pinto beans for the black beans. Use your favorite jarred red salsa in place of the salsa verde. Add toppings like guacamole or diced red onion.
Double the Recipe: Cooking for a crowd? Double the recipe to use the entire can of beans and get two sheet pans with 24 tacos!
For more healthy cooking inspiration, join us on Facebook, Instagram, and Pinterest and join our FREE email list for the latest recipes straight to your inbox!

Sheet Pan Chicken Tacos
Ingredients
- 1 tablespoon olive oil
- ½ cup diced yellow onion
- 1 teaspoon minced garlic
- 2 cups cooked shredded chicken breast, I used rotisserie chicken
- ¾ cup black beans, rinsed and drained well (about ½ of a 15 ounce can)
- ½ cup frozen yellow corn, no need to thaw
- ½ teaspoon cumin
- ¼ teaspoon salt
- ¼ teaspoon freshly ground black pepper
- ¾ cup salsa verde, like Herdez
- 3 tablespoons chopped cilantro leaves
- 1 ½ cups shredded cheese, pepper Jack cheese or a combination of cheddar/jack
- 12 yellow corn tortillas, 6-inch, divided
- ⅓ cup vegetable oil, or as needed, for brushing
Optional Toppings
- Shredded iceberg lettuce, quartered cherry tomatoes, sour cream, and hot sauce
Instructions
- Heat the olive oil in a skillet over MEDIUM-LOW heat. Add the onions and sauté for 3 minutes, or until tender. Add the garlic, chicken, beans, corn, cumin, salt, and pepper. Sauté for about 2 minutes then add the salsa verde. Increase heat to MEDIUM and cook until bubbly, then lower the heat and allow to simmer for 3 or 4 minutes. Remove from the heat, stir in the cilantro, and set aside to rest.
- Preheat oven to 425 degrees F with the oven rack in the top third of the oven (one level up from center). Line a large rimmed baking sheet with parchment paper and set it aside.
- Wrap 6 tortillas in a double layer of wet paper towels. Microwave for 50 seconds, or until warm and pliable.
- Remove one tortilla from the paper towels and place it on a cutting board or other work surface (keep remaining tortillas wrapped in the wet paper towels). Brush one side of the tortilla with vegetable oil and flip it over. Place about 2 tablespoons of shredded cheese on one half of the dry side of the tortilla, then place about ¼ cup of the chicken mixture on top of the cheese. Fold the tortilla in half and place it on the prepared baking sheet, pressing the top down lightly. Repeat with remaining warm tortillas and filling. Then, repeat the process by heating the remaining 6 tortillas, brushing with oil, and stuffing.
- Bake in the preheated oven for about 20 minutes or until tortillas are golden and crispy. If the tops of the tortillas begin to curl as they bake, open the oven and press down very lightly on the taco with a spatula (be careful not to squish the filling out). Remove from the oven and let them rest for about 5 minutes.
- Use a spatula to transfer tacos to a platter, if desired. Garnish the tacos with your toppings of choice. Tortillas will continue to crisp as the tacos rest so it’s best to garnish them before they crisp up too much (the top should be easy to lift after they rest 5 minutes).
Nutrition
Nutrition information is automatically calculated using generic ingredients, and is an estimate not a guarantee. For more accurate results, please refer to the labels on your ingredients at home. All information provided regarding nutrition on this website is intended to be used for informational purposes only. Content related to nutrition is not medical advice nor is it intended to replace medical advice. The website is not intended to diagnose, prescribe, or treat any disease, condition, illness, or injury. Before beginning any diet program, modifying your diet, or making changes to the diet of a child in your care, including following the nutrition information available on the website, you should seek advice from a licensed professional.
More Mexican-Inspired Meals

Rotisserie Chicken Tacos

Turkey Tacos
Chili Lime Chicken Tacos